The following example illustrates a comprehensive approach to building an appropriately configured rules file in an active network environment.
Scan for Open Ports
Ensure that the TCPIPSECURITY library is currently running a rules file configured to allow all traffic to the MCP host.
Use the NMAP feature of the Security Policy Management snap-in to perform a TCP and UDP scan for open ports on the MCP host.
-
Right-click NMAP an MCP Server from the TCP/IP Filtering node.
A message box appears informing users of the amount of overhead involved in performing a network scan.
-
You are prompted to temporarily disable TCP/IP logging before running the scan.
-
Ensure that the TCP/IP Reports have been disabled, and click OK.
The Scan Network Ports dialog box is displayed
-
Enter the TCP/UDP Port Ranges 1-20000.
-
Click Scan.
-
Once the scan runs, a report appears in the result pane displaying a list of open ports as well as their connection status.
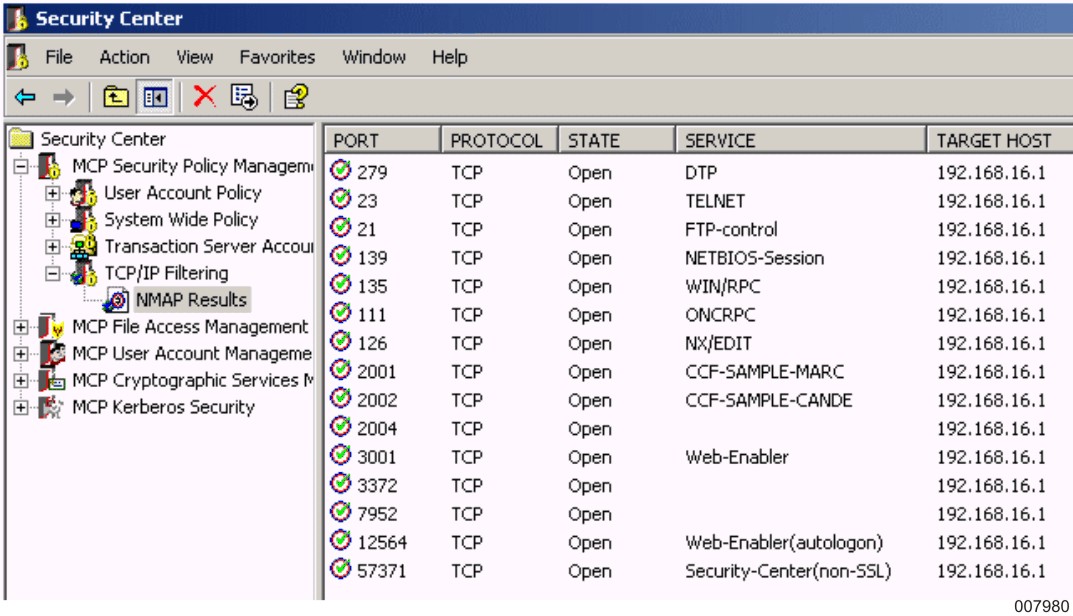
From the results of the NMAP scan, determine which services should be accessible. Take into account IP address fields when building the rules file to ensure that services on the MCP host are only accessible to IP networks where hosts reside that should be permitted to reach the MCP host.
In this example, the following TCP ports accepted connections on the MCP host:
-
21 (FTP-control)
-
23 (TELNET)
-
111 (ONCRPC)
-
126 (NX/EDIT)
-
135 (WIN/RPC)
-
139 (NETBIOS-Session)
-
279 (DTP)
-
2001 (CCF-SAMPLE-MARC)
-
2002 (CCF-SAMPLE-CANDE)
-
2004
-
2488 (Webts-admin)
-
3001 (Web-Enabler)
-
3372
-
7952
-
12564
-
57371 (Security Center nonSSL)
No UDP ports appeared responsive to this scan.
| Note: | Ports for which no service is displayed might be customer-specific ports. You can add ports into the MCPServices.txt file to define customer-specific ports. |
For the sake of this example, configure a rules file to allow for ports 21, 23, 135, 279, and 57371 to be accessible only within 192.63.0.0 subnet 255.255.0.0. In addition, 57372 (the Security Center SSL/TLS-enabled port) should remain accessible from within the 192.63.0.0 subnet, even though the service is not currently enabled.
Note that TCP ports 57371 and 57372 should never be completely restricted in the rules file because they are the ports that Security Center uses to communicate. If access to either of these ports is restricted, the Security Center snap-ins cannot function.
TCP ports 80, 126, 139, 2001, 2002, 2004, and 3001 can remain accessible from any IP network.
Configure a New Rules File
With these requirements in mind, configure the rules file.
-
Using the Security Policy Management snap-in, connect to the MCP host.
-
Right-click the TCP/IP Filtering node in the scope pane, and then click New Filtering Rules File.
-
Click Next to get to the second dialog box of the TCP/IP Rules File Test wizard.
-
Click Add and then click Allow Rule.
-
Use the Edit Allow Rule dialog box to create an allow rule for each previously mentioned port. Enforce the IP address restrictions for the ports that are to be restricted to specific IP networks.
Test the Rules File
-
Right-click the TCP/IP Filtering node, and then click Test Filtering Rules File.
-
Select the newly created allow rule from the list and click Test.
-
Click through the first dialog box of the TCP/IP Rules File Test wizard, and then click Next on the second dialog box as well.
-
Click Test TCP to begin testing TCP traffic against the rules file.
-
Provide a name for the test results that are to be created.
-
From the Test TCP Connections dialog box, type 0-65535 in the Local Port Range box.
-
Type the IP address of the MCP connection through which you intend to receive traffic in the Local IP Address box.
-
Type the IP address of the MCP environment in the Remote IP Address box.
-
Select the TCP Authorized Applications box, and select both the Passive and Active Connection Type boxes.
-
Click Test and verify that the results indicate that the rules file allows all traffic.
-
Repeat the preceding steps under a second set of test results. This time specify a different address in the Remote IP Address box. This action tests the effect of the rules file on traffic coming from outside the local IP network.
Deploy the Rules File
Assuming the displayed test results are satisfactory, deploy this rules file by right-clicking the file and then clicking Save As.
Navigate through the dialog to MCP Neighborhood to the MCP host and save the file on the pack on which TCPIP SECURITY is installed. Remove the file extension (.tfr_m) to save the file in MCP format.
Use the NW TCPIP SECURITY RELOAD “file name” command to deploy this rules file. If you save the file with the existing rules file name, you can omit “file name” from the RELOAD command.
Rescan to Verify Rules File
Perform another NMAP scan of the MCP system to verify that access has been appropriately modified. Take into account that the results of an NMAP scan vary depending on where the scan is conducted. For this example, if an NMAP scan is performed from a workstation residing within the 192.63.0.0 subnet, a broader range of ports remain visible than if an NMAP scan were performed from outside of this subnet.
Component Field Syntax
The TCP/IP Rules File Test wizard is used to create and modify the rules file. There is no need to manually edit the rules file. Component Field Syntax lists the proper way of expressing port ranges, IP address ranges, and time, in the rules file.
Table 35. Component Field Syntax
|
Field |
Description |
|---|---|
|
Port Range |
Consists of a pair of valid port numbers. The second port number can be null, greater than, or equal to the first port number. Three examples of port ranges follow: Lower = 55 Upper Port = 55 Lower port = 25 Upper Port = 30 Lower port = 15 |
|
Address Range |
Consists of an IP address and address map. This combination specifies a range of IP addresses for which the rule applies, much the same way that an IP supernet mask is used. The TCPIPSECURITY library applies the map to the IP addresses or requests. The result is then compared to the IP address specified in the rule. The address map is a 32-bit address mask that, when applied to the IP Address portion, yields the intended range. This field can also have a value of null or empty. An empty address map defaults to a 32-bit address mask of all 1's (ones) to specify a single IP address rather than a range as identified in the IP address portion of this field. IP addresses are specified as a sequence of 12 digits. The following example shows how to represent IP address 192.39.0.1: IP Address = 192.039.000.001 An example of an address range follows: IP Address = 199.045.000.000 Subnet = 255.255.000.000 This example identifies an address range of 199.045.000.000 through 199.045.255.255. The address mask identifies the network/subnet portion of the address by turning on those bits. |
|
Time Range |
Contains four digits and represents a valid 24-hour time. Valid values are 00:00 through 23:59. An example of a range of time from 6:30 a.m. to 9:00 p.m. follows: Start Time = 06:30 End Time = 21:00 |
