To access the ROC application from ASP.NET Web Forms, perform the following:
Open an AB Suite application in the Developer Environment.
For example, Sample.
Add an Ispec and set the following properties for the Ispec in the Properties window.
PresentationType: Graphical & Fixed
MemberVisibility and Visibility: Public
Add a Main method to the Ispec.
Enter the following syntax in the Logic tab of the Main method.
DoWhen (SWSYS = GLB.SPACES)
Message Error "Enter system name"
EndExit
:: Build up switch command
DoWhen (SWSYS <> GLB.SPACES)
SwitchTo SWSYS
EndExit
Add a Label in the Painter tab of the Ispec and set the Text property as appropriate.
For example, you can set the Text property of the Label to “Enter the application name you want to switch to”.
Add a TextField in the Painter tab of the Ispec, so that the user can enter the application name to switch to.
Set the required Length for the Attribute of the TextField in the Properties window.
Rename the TextField Attribute to SWSYS.
Build the AB Suite application with the User Defined View Generator property set to ASP.NET Web Forms in the bundle folder Property Pages window.
For example, set the following parameters for the single AB Suite host application as below.
Package Prefix: com.unisys
CE Application Name: Sample
CE bundle folder name: ASPNET
Import the ROC model that you want to access in Agile Business Suite Developer.
For example, you can import ROCCLR.model.
Note: Since the name of the Windows Runtime ROC system in Agile Business Suite 7.0 is ROC70, the segment name for a ROC application in Agile Business Suite Developer should also be ROC70. If your model displays the Segment name as ROC18, you must either change the Segment name or the ROC Alias name to ROC70.
Generate a bundle of the folder that contains the Ispecs of the ROC application.
Notes:
Ensure that the name of the bundle folder is same as the CE bundle folder for the AB Suite application. For example, ASPNET.
To generate a bundle folder, you must set all the properties that are required to build an application.
Create a view of the AB Suite and ROC applications separately, using the Runtime Administration Tool.
Refer to Creating Views for more information on how to create a view.
Create a virtual directory for the AB Suite and ROC applications using the SetupASPNet.vbs file located in the path, <root folder>:\NGEN_CE\ASP.NET Generator\Utilities\Setup.
Refer to the Agile Business Suite Component Enabler User Guide for more information on how to create a virtual directory.
Run CompileASPNet.bat from the <root directory>\NGEN_CE\classes\com\unisys\<AB Suite application name>\<bundle folder name>\views folder.
Run CompileASPNet.bat from the <root directory> \NGEN_CE \classes\com\unisys\<roc70>\<bundle folder name>\views folder.
Configure the Web.config file present in the views folder of both the applications.
Refer to the Agile Business Suite Component Enabler User Guide for more information on how to configure the Web.config file.
Note: You can access ROC separately after this step. To access ROC from the AB Suite application, complete the following steps.
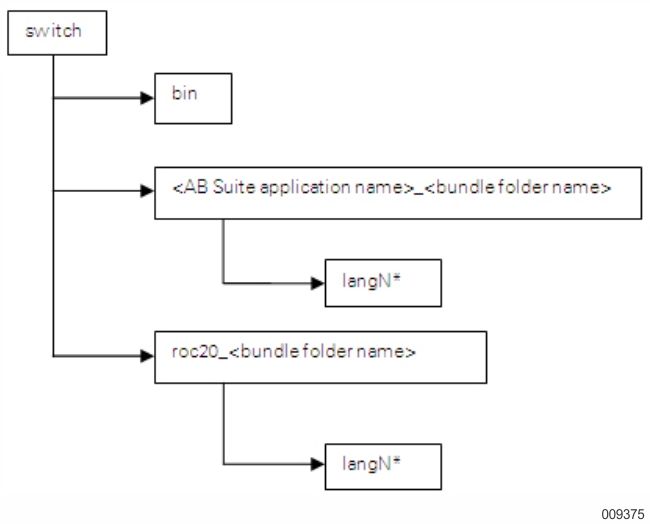
Create a folder structure in a preferred location on your machine, as shown in the following diagram.
For example, C:\switch\
*N represents the language or locale number. For example, lang1033 for English.
Here, switch is the top level folder containing sub-folders for each application that switchs between.
Copy the following files from the <root directory>\NGEN_CE\ASP.NET Generator\bin64 folder to the switch\bin64 folder.
UniCombo.dll
UniMenu.dll
CEWebFormRenderer.dll
Copy the contents of <root directory>\NGEN_CE\classes\com\unisys\<AB Suite application name>\<bundle folder name>\views\langN* to the langN* folder under switch\<AB Suite application name>_<bundle folder name>.
Copy the contents of <root directory>\NGEN_CE\classes\com\unisys\<roc70>\<bundle folder name>\views\langN* to the langN* folder under switch\<roc70>_<bundle folder name>.
Copy the following infrastructure files from the <root directory>\NGEN_CE\classes\com\unisys\<AB Suite application name>\<bundle folder name>\views folder to the switch\<AB Suite application name>_<bundle folder name> folder.
Close.ascx
Close.ascx.cs
Close.ascx.designer.cs
IspecView.cs
Login.ascx
Login.ascx.cs
Login.ascx.designer.cs
SessionErr.aspx
SessionErr.aspx.cs
SessionErr.aspx.designer.cs
TimeOut.ascx
TimeOut.ascx.cs
TimeOut.ascx.designer.cs
UserConrolView.cs
Copy the above-mentioned infrastructure files from the <root directory>\NGEN_CE\classes\com\unisys\<roc70>\<bundle folder name>\views folder to the switch\<roc70>_<bundle folder name> folder.
Copy the following files from the <root directory>\NGEN_CE\ASP.NET Generator\Common\User folder to the switch folder.
BrowserCaps.cs
BrowserClose.aspx
BrowserClose.aspx.cs
BrowserClose.aspx.designer.cs
CEASPNETWebForm.csproj
CEASPNETWebForm.sln
CEWFRCommonScript.js
Default.aspx
Default.aspx.cs
Default.aspx.designer.cs
ErrorStrings.cs
Global.asax
Global.asax.cs
UniMenuScript.js
Copy the following files from the <root directory>\NGEN_CE\classes\com\unisys\<AB Suite application name>\<bundle folder name>\views folder to the switch folder.
CompileASPNet.bat
Web.config
Run CompileASPNet.bat from the switch folder.
Configure the Web.config file present in the switch folder and ensure that ApplicationSwitching is set to true.
Refer to the Agile Business Suite Component Enabler User Guide for more information on how to configure the Web.config file.
Create a virtual directory switch using Internet Information Services (IIS), and point it to the switch folder location. For example, C:\switch.
Type the following in the address bar of Internet Explorer. “http://<deployment host name>/switch/default.aspx”.
The AB Suite application is displayed in the browser with a list of Ispecs.
Note: If you specify an Ispec as the Fireup Ispec in the Segment properties, the application displays the same Ispec, instead of a list of Ispecs.
Select the Ispec that you created at the beginning of the procedure, and click OK.
The Ispec opens and prompts you to enter the ROC application name you want to switch to.
Notes:
If the application opens with a Menu Ispec, right-click Select a Form and open the Ispec that you created at the beginning of the procedure.
If the application opens with the Ispec that you created at the beginning of the procedure, perform step 30 to switch to the ROC application.
Enter the ROC application name in the Ispec text field and press Enter.
The ROC application is displayed.